Have you ever found yourself craving that sweet-savory flavor of restaurant teriyaki chicken but didn’t want to order takeout? I’ve been there too many times. After years of trial and error, I’ve finally perfected an easy teriyaki chicken recipe that rivals my favorite Japanese restaurant’s version—and the best part? It takes just 30 minutes from start to finish.
When I first attempted to make teriyaki chicken at home, I was intimidated by what I thought would be a complicated process. Store-bought sauces never quite hit the mark, and I assumed making authentic teriyaki required ingredients I didn’t have. I was wrong! The perfect teriyaki sauce needs just a handful of pantry staples, and the cooking technique is surprisingly straightforward.
Today, I’m sharing my go-to recipe that’s become a weekly staple in my household. Whether you’re meal prepping for busy weekdays or impressing dinner guests with minimal effort, this recipe delivers restaurant-quality results without the wait or the bill.
What Makes This Teriyaki Chicken Special?
Before diving into the recipe, let’s talk about what sets this teriyaki chicken apart:
- Authentic flavor without hard-to-find ingredients – Everything you need is available at standard grocery stores
- Perfect sauce consistency – Not too thin, not too thick, and it caramelizes beautifully on the chicken
- Versatility – Works with any cut of chicken and pairs with various sides
- Meal-prep friendly – Tastes even better the next day
The Secret to Perfect Teriyaki Sauce
The heart of any teriyaki dish is the sauce. Traditional Japanese teriyaki sauce consists of just four ingredients: soy sauce, mirin (a sweet rice wine), sake, and sugar. My version stays true to these flavors while making a few practical adjustments for home cooks.
The key to perfect teriyaki sauce is balancing sweet and savory elements while achieving that signature glossy texture. This comes from the natural caramelization of sugars and a small amount of cornstarch that helps the sauce cling to the chicken.
Ingredients You’ll Need
For the Chicken:
- 1.5 pounds boneless, skinless chicken thighs (or breasts if you prefer)
- 2 tablespoons vegetable oil
- 1/4 teaspoon salt
- 1/4 teaspoon black pepper
- 2 cloves garlic, minced
- 1 tablespoon fresh ginger, grated
For the Teriyaki Sauce:
- 1/2 cup low-sodium soy sauce
- 1/4 cup water
- 3 tablespoons brown sugar (light or dark works)
- 1 tablespoon honey
- 1 tablespoon rice vinegar (or apple cider vinegar in a pinch)
- 2 cloves garlic, minced
- 1 teaspoon fresh ginger, grated
- 1 tablespoon cornstarch
- 2 tablespoons water (for cornstarch slurry)
For Serving:
- 2 green onions, thinly sliced
- 1 tablespoon toasted sesame seeds
- Steamed rice
- Steamed broccoli or your preferred vegetables
Equipment Needed
Nothing fancy required here:
- Large skillet or wok
- Cutting board and knife
- Measuring cups and spoons
- Small bowl for mixing cornstarch slurry
- Medium bowl for sauce
Step-by-Step Instructions
Step 1: Prepare the Chicken
- Cut the chicken into bite-sized pieces, about 1-inch cubes.
- Season with salt and pepper.
- Heat vegetable oil in a large skillet over medium-high heat.
- Add the chicken pieces in a single layer (work in batches if needed to avoid overcrowding).
- Cook for 3-4 minutes on each side until golden brown and nearly cooked through.
- Add minced garlic and grated ginger to the skillet and stir for 30 seconds until fragrant.
- Transfer chicken to a plate and set aside.
Step 2: Make the Teriyaki Sauce
- In the same skillet (no need to clean it), add soy sauce, water, brown sugar, honey, and rice vinegar.
- Stir in garlic and ginger.
- Bring to a gentle simmer over medium heat, stirring occasionally to dissolve the sugar.
- Meanwhile, in a small bowl, mix 1 tablespoon cornstarch with 2 tablespoons water to create a slurry.
- Once the sauce is simmering, slowly pour in the cornstarch slurry while stirring continuously.
- Continue to simmer and stir until the sauce thickens, about 1-2 minutes.
Step 3: Combine and Finish
- Return the chicken to the skillet, including any accumulated juices.
- Toss to coat each piece evenly with the sauce.
- Simmer for 2-3 more minutes until the chicken is fully cooked and the sauce has caramelized slightly.
- Taste and adjust seasoning if needed.
Step 4: Serve
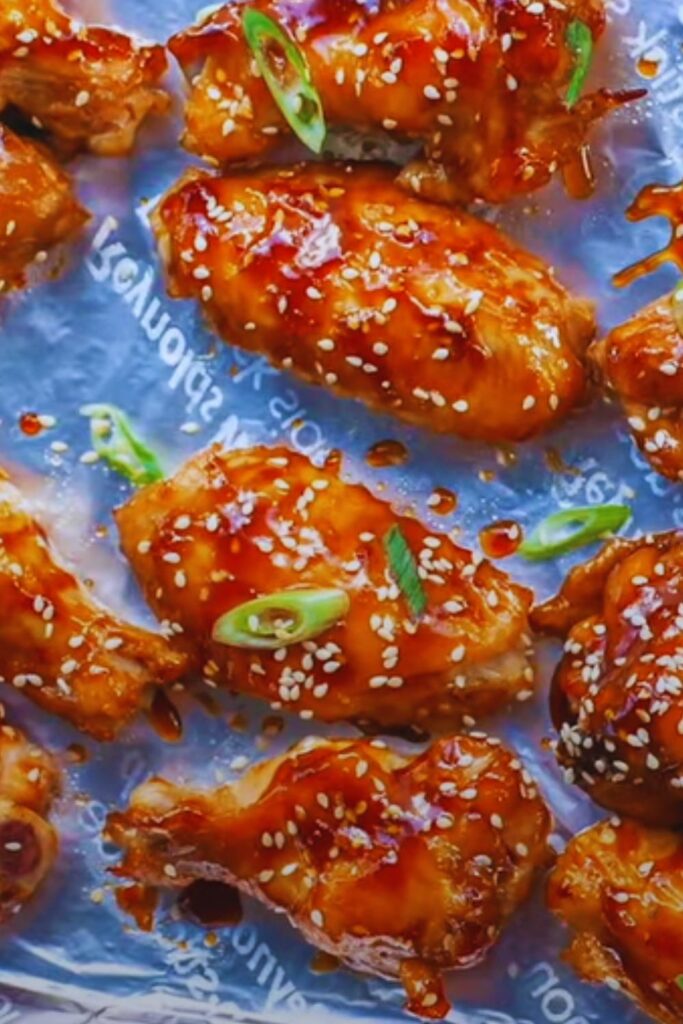
- Transfer to a serving dish and sprinkle with sliced green onions and sesame seeds.
- Serve immediately over steamed rice with your choice of vegetables.
The Science Behind Perfect Teriyaki
What makes teriyaki chicken so irresistible? It’s all about the Maillard reaction and caramelization.
The Maillard reaction occurs when proteins and sugars in the chicken and sauce are exposed to heat, creating hundreds of different flavor compounds. This reaction gives teriyaki chicken its characteristic depth of flavor and appealing brown color.
Caramelization happens when the sugars in the sauce are heated, breaking down into sweeter, more complex flavors. This creates that signature glossy finish and sticky texture we all love.
By cooking the chicken first and then finishing it in the sauce, we maximize both of these processes for the most flavorful result.
Variations to Try
Don’t be afraid to make this recipe your own! Here are some delicious variations:
Protein Options:
- Swap chicken for thinly sliced beef (cook for less time)
- Use firm tofu for a vegetarian version (press first to remove excess moisture)
- Try with salmon fillets for a pescatarian twist
Flavor Boosters:
- Add 1 tablespoon of orange zest for a citrusy note
- Include 1-2 teaspoons of sriracha or red pepper flakes for heat
- Stir in 1 tablespoon of peanut butter for a nutty variation
Vegetable Add-ins:
- Bell peppers
- Snow peas
- Carrots
- Mushrooms
- Bok choy

Nutritional Information
I believe in knowing what goes into your food. Here’s the approximate nutritional breakdown for one serving of this teriyaki chicken (without rice or additional vegetables):
| Nutrient | Amount per Serving |
|---|---|
| Calories | 320 |
| Protein | 28g |
| Carbohydrates | 17g |
| Sugars | 15g |
| Fat | 16g |
| Saturated Fat | 3g |
| Fiber | 0g |
| Sodium | 850mg |
Note: Values are approximate and may vary based on specific ingredients and brands used.
Make-Ahead and Storage Tips
This recipe works beautifully for meal prep. Here’s how to store and reheat:
Refrigerator Storage:
- Cool completely before transferring to airtight containers.
- Store chicken and sauce together for maximum flavor infusion.
- Refrigerate for up to 4 days.
- Store rice separately to prevent it from absorbing all the sauce.
Freezer Storage:
- Portion into freezer-safe containers.
- Freeze for up to 3 months.
- Thaw overnight in the refrigerator before reheating.
Reheating Instructions:
- Microwave: Heat for 1-2 minutes, stirring halfway through.
- Stovetop: Add a splash of water and reheat over medium-low heat until warmed through.
Common Mistakes to Avoid
In my years of making teriyaki chicken, I’ve made plenty of mistakes. Learn from them so you don’t have to:
- Overcrowding the pan: This causes the chicken to steam rather than brown. Cook in batches if needed.
- Cutting chicken unevenly: Different-sized pieces cook at different rates, leading to some overcooked and some undercooked pieces.
- Adding cornstarch directly to hot sauce: This creates lumps. Always make a slurry with cold water first.
- Over-thickening the sauce: The sauce will continue to thicken as it cools, so stop cooking when it’s slightly thinner than your desired final consistency.
- Using regular soy sauce without adjusting: If you only have regular (not low-sodium) soy sauce, use 1/3 cup soy sauce and 2/3 cup water instead.
Serving Suggestions

Teriyaki chicken is incredibly versatile. Here are my favorite ways to serve it:
Traditional Pairings:
- White jasmine or short-grain rice
- Steamed broccoli, carrots, or snap peas
- Cucumber salad with rice vinegar dressing
Creative Alternatives:
- Served over cauliflower rice for a lower-carb option
- Wrapped in lettuce cups for a light lunch
- Added to a grain bowl with quinoa and roasted vegetables
- Stuffed into a wrap with crunchy vegetables and avocado
Side Dishes That Complement:
- Miso soup
- Simple green salad with ginger dressing
- Edamame beans sprinkled with sea salt
- Quick-pickled vegetables
Frequently Asked Questions
Q: Can I use chicken breasts instead of thighs? A: Absolutely! Chicken breasts work perfectly in this recipe, though they tend to cook a bit faster than thighs. Keep a close eye on them to prevent overcooking, as they can dry out more easily. I recommend reducing the initial cooking time by about 1 minute per side.
Q: Is there a way to make this recipe gluten-free? A: Yes, simply substitute tamari or coconut aminos for the soy sauce. Double-check that your rice vinegar is gluten-free, as some brands may contain traces of gluten.
Q: How can I make this teriyaki chicken less sweet? A: Reduce the brown sugar to 1-2 tablespoons and omit the honey. You can also increase the rice vinegar by an additional teaspoon for more tanginess.
Q: What if I don’t have fresh ginger? A: You can substitute 1/4 teaspoon of ground ginger for each teaspoon of fresh ginger called for in the recipe. The flavor won’t be quite as bright, but it will still be delicious.
Q: Can I make the sauce ahead of time? A: Definitely! The teriyaki sauce can be made up to a week in advance and stored in an airtight container in the refrigerator. Just reheat it gently before adding the chicken.
Q: My sauce got too thick! How can I fix it? A: Simply whisk in water, 1 tablespoon at a time, until you reach your desired consistency. Reheat gently if needed.
Q: Is there a way to make this recipe without refined sugar? A: Yes, you can replace the brown sugar with coconut sugar or maple syrup. The flavor profile will be slightly different but still delicious.
Why This Recipe Works Every Time
After making this teriyaki chicken countless times, I’ve pinpointed exactly why it’s so reliable:
- Proper heat management: Starting with high heat to brown the chicken, then reducing to simmer the sauce prevents burning and ensures even cooking.
- The cornstarch slurry: This thickening agent gives the sauce body without making it gloopy or flour-tasting.
- Two-stage cooking process: Cooking the chicken first, then finishing in the sauce allows for proper browning while ensuring the meat stays juicy.
- Balanced flavors: The specific ratio of soy sauce, sugar, honey, and vinegar creates the perfect savory-sweet balance.
- Aromatic foundation: Fresh garlic and ginger provide depth that bottled sauces simply can’t match.
The History of Teriyaki
While we enjoy teriyaki as a quick weeknight dinner today, this cooking method has a rich history. The term “teriyaki” comes from the Japanese words “teri,” meaning luster, and “yaki,” meaning grilled or broiled. Traditional teriyaki refers to a cooking technique where foods are glazed with a sweet-soy mixture and grilled or broiled.
The teriyaki style we know in Western countries has evolved significantly from its Japanese origins. In Japan, teriyaki sauce is typically applied to grilled fish, while the chicken version became popular in Japanese-American communities, particularly in Hawaii.
The Hawaiian influence introduced pineapple juice and ginger to many teriyaki recipes, creating the sweeter, thicker sauce we often associate with teriyaki today. Our version leans more toward this Americanized style while maintaining the essential elements that make teriyaki so delicious.
Final Tips for Teriyaki Success
After years of refining this recipe, I’ve gathered a few extra tips that make all the difference:
- Pat chicken dry: Before seasoning, pat the chicken pieces dry with paper towels. This helps them brown better.
- Don’t rush the browning: Those caramelized bits on the bottom of the pan after browning the chicken? That’s flavor! Make sure to scrape them up when you add the sauce ingredients.
- Taste as you go: Everyone’s preference for sweet-salty balance is different. Taste your sauce before adding the chicken back in and adjust accordingly.
- Let it rest: Giving the finished dish 5 minutes to rest before serving allows the sauce to penetrate the meat more thoroughly.
- Garnish generously: Don’t skip the green onions and sesame seeds. They add freshness, texture, and visual appeal.
I hope this recipe becomes a favorite in your home as it has in mine. There’s something truly satisfying about creating a takeout favorite in your own kitchen—knowing exactly what goes into it and being able to customize it to your taste. Plus, the amazed looks on my family’s faces when I bring this to the table never gets old!
Happy cooking, and I’d love to hear how your teriyaki chicken turns out!
Q&A Section
Q: How do I know when the chicken is cooked through? A: The safest way is to use an instant-read thermometer—chicken is fully cooked when it reaches an internal temperature of 165°F (74°C). Without a thermometer, look for pieces that are no longer pink in the center and have clear (not cloudy) juices when cut.
Q: My sauce never gets thick enough. What am I doing wrong? A: The most common issue is not allowing the sauce to simmer long enough after adding the cornstarch slurry. Make sure to keep it at a gentle simmer for at least 1-2 minutes. Also, remember that the sauce will thicken further as it cools.
Q: Can I use this same sauce for beef or pork? A: Absolutely! This teriyaki sauce works beautifully with thinly sliced beef or pork tenderloin. Just adjust cooking times accordingly—beef strips might need only 1-2 minutes per side, while pork will be similar to chicken.
Q: How spicy is this recipe? A: As written, this recipe is not spicy at all. It’s sweet-savory with no heat. If you’d like to add spice, incorporate 1/2 to 1 teaspoon of crushed red pepper flakes or a tablespoon of sriracha when making the sauce.
Q: What’s the best way to slice green onions for garnish? A: For the most attractive presentation, slice green onions thinly on a diagonal (about 1/8-inch thickness). Use both the white and green parts for color contrast.
Q: I’m watching my sodium intake. How can I reduce the salt in this recipe? A: Great question! Use reduced-sodium soy sauce and cut it with more water (try a 1:1 ratio instead of the recipe’s proportions). You can also increase the vinegar and ginger to add flavor without sodium.