
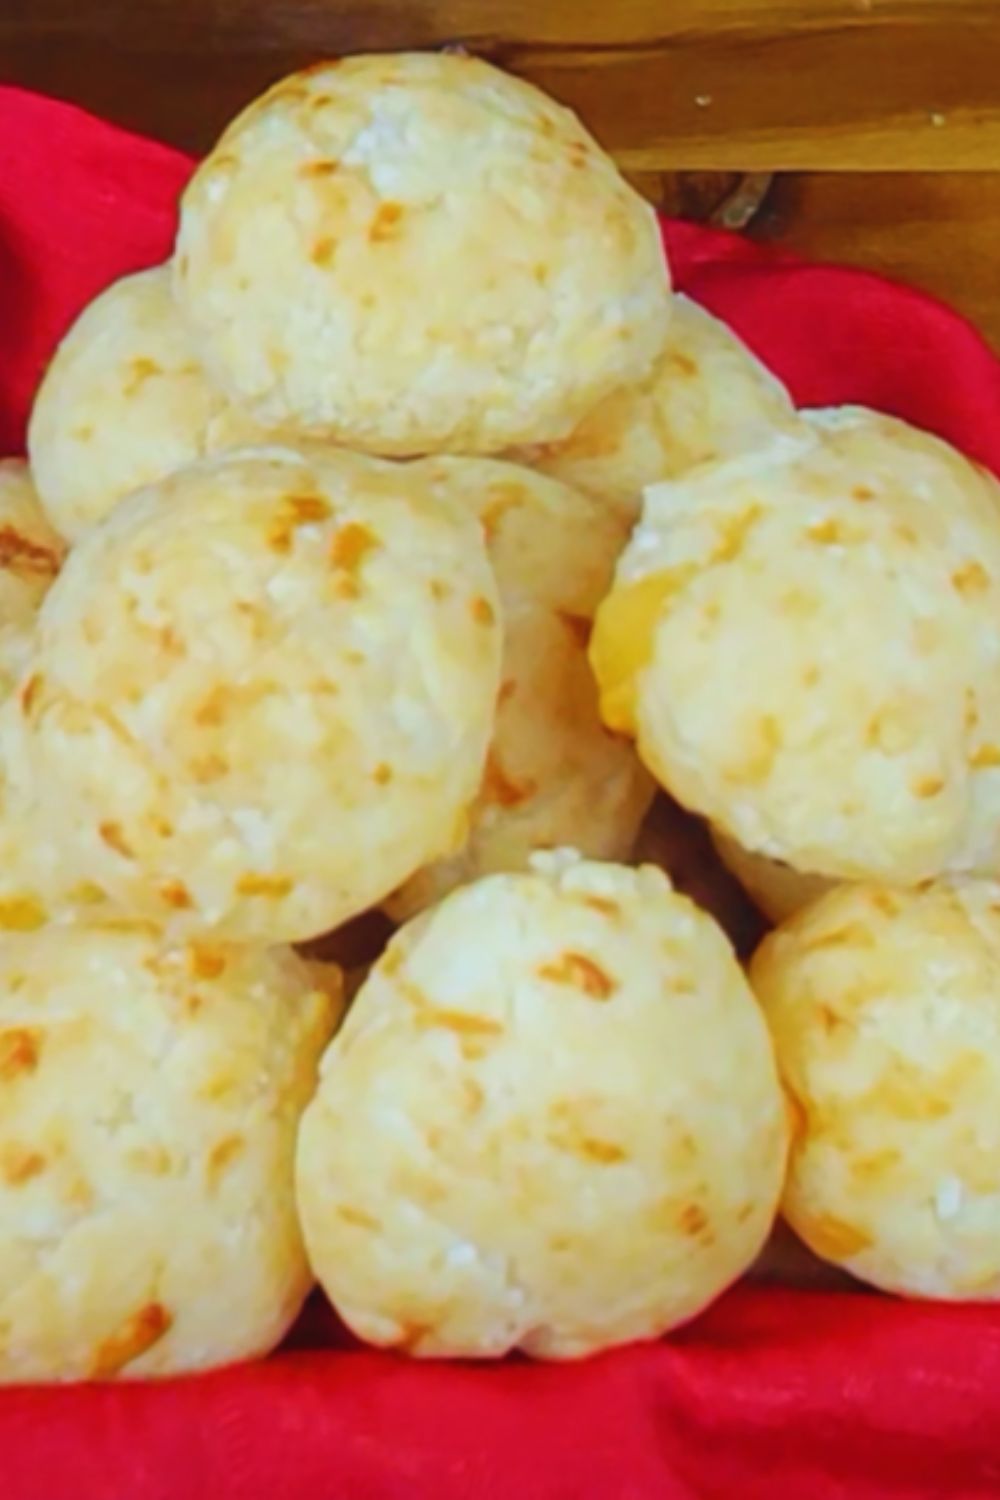
There’s something magical about biting into a warm, cheesy Brazilian cheese bread ball fresh from the oven. That crispy exterior giving way to a chewy, stretchy, cheesy interior is an experience that’s hard to beat. I’ve been perfecting my pão de queijo recipe for years, and today I’m sharing all my secrets so you can enjoy this delightful Brazilian treat at home.
What is Pão de Queijo?
Pão de queijo (pronounced “pow-duh-kay-zhoo”) literally translates to “cheese bread” in Portuguese. These small, round cheese rolls are a beloved staple in Brazilian cuisine. What makes them unique is that they’re made with tapioca flour (also called cassava flour or polvilho) instead of wheat flour, making them naturally gluten-free.
I first encountered these little balls of heaven during a trip to Brazil years ago, and I’ve been hooked ever since. The contrast between the crispy exterior and chewy interior, combined with that tangy cheese flavor, creates a truly unforgettable snack.
The History Behind Brazilian Cheese Bread
The story of pão de queijo begins in the state of Minas Gerais in southeastern Brazil during the 18th century. During colonial times, when wheat was scarce and expensive, African slaves who worked in the mines and plantations created bread using local ingredients available to them – primarily cassava root.
Originally, these early versions didn’t contain cheese. It wasn’t until later, when dairy farming became prominent in Minas Gerais, that cheese was incorporated into the recipe, creating what we now know as pão de queijo.
What I love about this humble bread is how it represents Brazilian ingenuity and cultural fusion – taking a necessity (the use of local ingredients) and transforming it into something extraordinary that’s now enjoyed worldwide.
Key Ingredients for Authentic Pão de Queijo
The beauty of Brazilian cheese bread lies in its simple ingredients. Here’s what you’ll need:
- Tapioca flour/starch (polvilho): The foundation of pão de queijo, giving it that distinctive chewy texture. There are two types – sweet (doce) and sour (azedo). I prefer using a mix of both for the best texture and flavor, but either will work.
- Milk: Adds moisture and helps create the dough. Whole milk creates the richest result.
- Oil or butter: Provides richness and helps create that crispy exterior.
- Eggs: Act as a binding agent and add structure.
- Cheese: Traditionally, Brazilian cheese bread uses queijo Minas, a fresh, mild cheese from Minas Gerais. Since this is difficult to find outside Brazil, I use a mixture of parmesan for sharpness and low-moisture mozzarella for that stretchy texture.
- Salt: Enhances all the flavors.
Types of Tapioca Flour
The choice of tapioca flour significantly impacts your pão de queijo. Here’s a breakdown:
| Type | Characteristics | Effect on Pão de Queijo | Best For |
|---|---|---|---|
| Sweet Tapioca Flour (Polvilho Doce) | White, fine texture, neutral flavor | Lighter, milder bread with softer texture | Those who prefer a milder flavor and lighter texture |
| Sour Tapioca Flour (Polvilho Azedo) | Slightly off-white, fermented, tangier | More authentic flavor, chewier texture with more “bounce” | Traditional pão de queijo with complex flavor |
| 50/50 Mix | Balanced properties | Best of both worlds – good flavor and texture | My recommended approach for beginners |
The sour variety undergoes a natural fermentation process, giving it a distinct tanginess that contributes to the classic pão de queijo flavor. If you can only find one type, don’t worry! You can still make delicious cheese bread with either variety.
The Cheese Factor
While traditional Brazilian cheese bread uses queijo Minas, I’ve experimented with numerous cheese combinations over the years. Here’s what works best:
| Cheese Type | Flavor Profile | Meltability | Recommended Ratio |
|---|---|---|---|
| Parmesan | Sharp, salty, umami | Low (adds flavor not stretch) | 50-60% of cheese portion |
| Low-moisture Mozzarella | Mild, creamy | High (creates stretchy texture) | 40-50% of cheese portion |
| Cheddar | Sharp, tangy | Medium | Can replace up to 25% of total cheese |
| Gruyère | Nutty, complex | Medium-high | Can replace up to 25% of total cheese |
| Queijo Minas (if available) | Fresh, mild, slightly tangy | Medium | Use 100% if available |
I’ve found that the combination of parmesan and mozzarella creates the perfect balance of flavor and texture. The parmesan provides that savory depth, while the mozzarella gives you those delightful cheese pulls when you tear into a warm roll.
The Ultimate Brazilian Cheese Bread Recipe
Now, let’s get to the main event—the recipe! This makes approximately 20-24 small cheese breads.
Ingredients:
- 2 cups tapioca flour (ideally 1 cup sweet, 1 cup sour if available)
- 1 cup whole milk
- 1/3 cup vegetable oil or melted butter
- 1 teaspoon salt
- 2 large eggs, room temperature
- 1 cup finely grated parmesan cheese
- 1 cup shredded low-moisture mozzarella
Equipment:
- Medium saucepan
- Wooden spoon
- Stand mixer or large bowl
- Mini muffin tin (preferred) or baking sheet
- Measuring cups and spoons
Step-by-Step Instructions:
- Preheat your oven to 400°F (200°C) and grease a mini muffin tin or line a baking sheet with parchment paper.
- Prepare the tapioca mixture: In a medium saucepan, combine the milk, oil, and salt. Bring to a gentle boil over medium heat, stirring occasionally.
- Create the base dough: As soon as the milk mixture boils, remove from heat. Add all the tapioca flour at once and stir vigorously with a wooden spoon until well combined. The mixture will be very stiff and look somewhat lumpy—this is normal! Let it rest for about 5 minutes to cool slightly.
- Incorporate the eggs: Transfer the dough to a stand mixer fitted with a paddle attachment (or keep in the bowl if mixing by hand). Beat on medium speed for 1-2 minutes to break down the dough. With the mixer running on low, add the eggs one at a time, incorporating each egg fully before adding the next. The dough will seem to separate at first but will come back together as you continue mixing.
- Add the cheese: With the mixer on low, add both cheeses and mix until evenly distributed. The dough will be very sticky and stretchy—this is exactly what you want!
- Form the cheese breads: If using a mini muffin tin, fill each cavity about 3/4 full. If using a baking sheet, use a small ice cream scoop or two spoons to form approximately 1.5-inch balls, placing them about 2 inches apart.
- Bake to perfection: Bake for 18-22 minutes, or until the tops are lightly golden. They should be crisp on the outside but still chewy inside.
- Enjoy immediately: These are best served warm, straight from the oven when the cheese is at its stretchiest.

Troubleshooting Your Pão de Queijo
Even with a straightforward recipe, things can sometimes go wrong. Here are solutions to common issues:
| Problem | Possible Cause | Solution |
|---|---|---|
| Too dense/not puffy enough | Overmixing the dough | Mix just until ingredients are combined |
| Oven not hot enough | Ensure oven is fully preheated to 400°F | |
| Old tapioca flour | Use fresh tapioca flour for best results | |
| Too dry | Incorrect flour-to-liquid ratio | Ensure measurements are accurate |
| Overbaking | Reduce baking time by 2-3 minutes | |
| Cheese bread deflates quickly | Normal behavior | Eat while warm! These naturally deflate as they cool |
| Dough too runny | Too much liquid | Add 1-2 tablespoons more tapioca flour |
| Eggs too large | Use medium eggs or reduce to 1 egg + 1 yolk | |
| Not cheesy enough | Mild cheese used | Increase parmesan ratio or try stronger cheese |
| Not enough cheese | Add an extra 1/4 cup of cheese |
The most important thing to remember is that pão de queijo should be eaten fresh from the oven. Like many bread products, they’re at their absolute best when warm.
Variations to Try
One thing I love about Brazilian cheese bread is how versatile it can be. Here are some of my favorite variations:
Herbs and Spices Versions
- Garlic Pão de Queijo: Add 2-3 minced garlic cloves or 1 teaspoon garlic powder to the dough
- Herbed Cheese Bread: Mix in 1 tablespoon of fresh herbs (rosemary, thyme, or oregano work well)
- Spicy Kick: Add 1/2 teaspoon cayenne pepper or 1 finely diced jalapeño
Cheese Variations
- Extra Sharp: Use aged cheddar or pecorino romano for a more intense flavor
- Smoky: Incorporate smoked gouda or smoked mozzarella
- Brazilian-Italian Fusion: Add a dollop of pesto to the dough
Stuffed Pão de Queijo
For an extra special treat, try stuffing your cheese breads:
- Form the dough into a small disc
- Place a small cube of cheese, a piece of guava paste, or a small spoonful of dulce de leche in the center
- Wrap the dough around the filling and seal well
- Bake as directed (may need 1-2 extra minutes)

Make-Ahead and Storage Options
While pão de queijo is best fresh from the oven, there are ways to prepare ahead:
Refrigerating the Dough
- The prepared dough can be refrigerated in an airtight container for up to 3 days.
- Let it come to room temperature for about 30 minutes before baking.
Freezing Options
- Unbaked dough balls: Form the dough into balls, place on a baking sheet, and freeze until solid. Transfer to a freezer bag and store for up to 3 months. Bake directly from frozen, adding 5-7 minutes to the baking time.
- Baked cheese bread: Allow to cool completely, then freeze in an airtight container for up to 1 month. Reheat in a 350°F oven for 5-7 minutes until warmed through.
Reheating Tips
- Microwave: 10-15 seconds (will be softer)
- Toaster oven: 3-4 minutes at 350°F (maintains better texture)
- Air fryer: 2 minutes at 350°F (restores some crispness)
Serving Suggestions
Brazilian cheese bread pairs beautifully with so many things. Here are my favorite ways to serve them:
- As part of a Brazilian-themed breakfast alongside fresh fruit and coffee
- With a hearty black bean soup or vegetable stew
- Alongside grilled meats at a churrasco (Brazilian barbecue)
- Split and filled with a slice of ham and cheese for a mini sandwich
- With a spicy tomato sauce for dipping
- Served with fresh guacamole or chimichurri
- As an accompaniment to a cheese board with fruity preserves
- With a steaming mug of hot chocolate for an indulgent snack
The best way to enjoy pão de queijo, however, is simply warm from the oven. I like to place them in a cloth-lined basket to keep them warm at the table.
The Cultural Significance
What I find fascinating about pão de queijo is how it has evolved from a food created out of necessity to a beloved national treasure. Today in Brazil, these cheese breads are enjoyed throughout the day:
- As a breakfast item with coffee
- As a mid-morning or afternoon snack
- As an appetizer before meals
- As a side dish with main courses
- Sold by street vendors as a quick bite
- Served at virtually every café and bakery throughout Brazil
In Brazilian homes, the smell of fresh pão de queijo baking is often associated with gathering family together. Many Brazilians have treasured family recipes passed down through generations.
Health Considerations
One of the wonderful aspects of pão de queijo is that it’s naturally gluten-free, making it accessible to those with celiac disease or gluten sensitivity. However, it’s important to ensure your tapioca flour hasn’t been processed in a facility that also processes wheat.
Nutritionally, these cheese breads are:
- Moderate in calories (about 90-110 calories each, depending on size)
- Good source of calcium from the cheese
- Source of protein (about 3-4g per roll)
- Low in sugar
For those with dietary restrictions:
- Dairy-free: Substitute the milk with coconut milk or another plant-based milk, and use a dairy-free cheese alternative.
- Egg-free: Replace each egg with 1 tablespoon of ground flaxseed mixed with 3 tablespoons of water (let sit for 5 minutes before using).
- Lower fat: Use reduced-fat cheese and replace some of the oil with additional milk.
Frequently Asked Questions
Q: Can I make pão de queijo without a stand mixer? Yes! While a stand mixer makes the process easier, you can absolutely mix the dough by hand. After adding the hot milk mixture to the tapioca flour, allow it to cool slightly, then vigorously beat in the eggs and cheese using a wooden spoon. It requires some arm strength, but it’s how many Brazilian home cooks make it.
Q: Why did my cheese breads not puff up? The most common reasons are: oven not hot enough (make sure to fully preheat), old tapioca flour (freshness matters), or overmixing the dough (which can deflate air bubbles). Also, make sure you’re using the right type of tapioca flour – regular tapioca flour/starch is what you need, not tapioca pearl products.
Q: Can I substitute regular all-purpose flour? No, regular wheat flour will not work. The unique chewy texture of pão de queijo comes specifically from tapioca flour. There is no direct substitute that will give you authentic results.
Q: Where can I find tapioca flour? Look in natural food stores, Latin or Asian markets, or the international foods section of well-stocked supermarkets. It’s also readily available online. Make sure you’re buying tapioca flour/starch (sometimes called cassava flour), not tapioca pearls.
Q: Why are my pão de queijo too hard? They likely baked too long. These cheese breads should be removed from the oven when they’re lightly golden – they continue to firm up as they cool. Also, they’re naturally meant to be crisp outside and chewy inside; if you’re expecting a soft dinner roll texture, that’s not authentic pão de queijo.
Q: Do I need to use a mini muffin tin? While a mini muffin tin helps create uniform shape and rise, you can absolutely make them free-form on a baking sheet. They’ll just be a bit more rustic looking, which has its own charm!
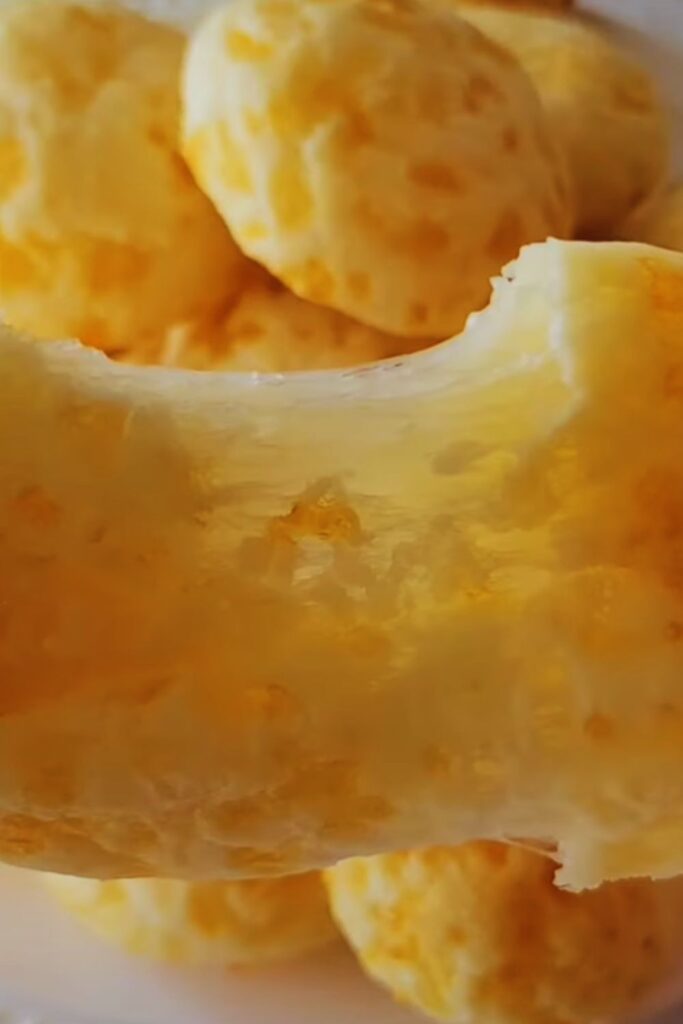
Q: Are Brazilian cheese breads supposed to be hollow inside? Yes! Authentic pão de queijo typically has a hollow center or large air pockets. This is part of their charm and traditional texture – crispy outside, chewy inner walls, and hollow centers that can be filled with delicious toppings if desired.
Q: How can I tell when they’re done baking? Look for light golden tops and a firm exterior when gently pressed. If you tap the bottom, it should sound somewhat hollow. Remember that they will continue to firm up as they cool.
Final Thoughts
My journey with Brazilian cheese bread has been a delicious adventure of testing, tweaking, and most importantly, tasting. What started as an attempt to recreate a beloved food memory from my travels has become a staple in my home. There’s something truly magical about the simplicity of these ingredients coming together to create something so uniquely satisfying.
Whether you’re gluten-free by necessity or just looking to explore the wonderful world of international breads, pão de queijo deserves a place in your culinary repertoire. The ingredients might be unfamiliar at first, but once you’ve made them a few times, you’ll find the process becomes second nature.
Remember, the key to perfect Brazilian cheese bread is not to overthink it. Embrace the sticky dough, don’t shy away from the cheese, and enjoy them warm from the oven. The smiles they’ll bring to your table are worth every bit of effort.
So go ahead – preheat that oven and get ready to experience one of Brazil’s most beloved culinary treasures right in your own kitchen. Your taste buds will thank you!

